Copper Fountains
Build a Pebble Pool
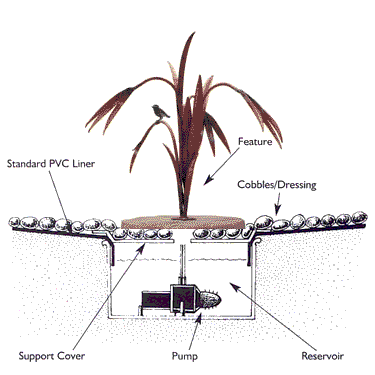
This is a simple and comparatively cheap way to create a pebble pool of any size. Even the largest of water features can be easily contained using this method.

Please note: the reservoir in the diagram is for illustration only and may need a larger capacity, depending on the size of the feature. Remember, it's much easier to look after a large volume of water than a small one.
Materials
Reservoir & lid
Pump
Conduit
Flexible pond liner
Pebbles
Sand/pond fleece
Bricks/stones for edging
Sand & cement
Tools Required
Tape measure
Spade
Sharp knife/scissors
Trowel
Spirit level
Instructions
To create a pebble-pool for any of our fountains is quite straight forward. Even the very largest water feature can be used on a pebble-pool and the whole thing can be custom-made to fit.
1. Establish the area you are going to require. This should not be under estimated! Wind and splashing from the fountain can quickly use up all of the water in the reservoir, if the pool is not of sufficient size. If you are unsure, then simply run the fountain on dry land, note the area that that gets splashed and go slightly beyond this.
2. Choose a reservoir. The type of the reservoir should reflect the size of the feature. You need to take into account the weight of the water feature and the amount of water that circulates through it, but generally I would not recommend anything less than 25 litres for the smallest fountain. The larger the capacity, the less likely it is to run out of water in the Summer months, so go for the biggest you can. Copper fountains are relatively light, so do not usually pose a problem with support unless you are going for one of the very large ones, such as the Norway Maple or Ginger Lily. In these cases you should take care that the lid is able to support the weight of the fountain.
3. Mark out your area where the pebble-pool is to be situated and find the centre point, this is where the reservoir is to be sunk. For the pool to work correctly you have to ensure that the top of the reservoir is below ground level and that the surrounding area has a slight slope towards it. With this in mind, prepare the ground, ensuring that any sharp stones are removed and sink the reservoir into a hole in the centre. A conduit (tube) should be buried under the soil, to house the pump cable. The pump should be installed at this point, please ensure a competent person follows the manufacturer's instructions regarding electrical connection.
4. Install a liner over the area of the pebble-pool. To prevent the liner from puncturing it is recommended that soft sand or a pond fleece is used to cover the area first. Cut the liner larger than required (you can trim it later) and lay it in position. Cut a hole out over the reservoir, leaving a lip around the edge to channel the water and fit the lid. Ensure that the lid has an access hole for the pump, as this allows for maintenance such as cleaning of the filter and adjusting the water flow.
5. The edge of the pebble-pool can be made with bricks or stones, which are best mortared together, with the liner passing underneath and up behind it. You do not have to have mortar the edge together but it does create a much more professional finish. The liner can then be trimmed to just below ground level.
6. Install the water feature in position and fill the area with your preferred covering, this can be pebbles, slate and even shells. Fill with water and turn on. You may need to adjust the water flow at this point using the pump regulator, until your fountain looks just right.

